I kept hassling Brinn yesterday to come out and take pictures of the stuff I was doing, so we should have a nice series of shots this morning. I think I could have finished this coop yesterday if I had started earlier in the morning.
It all starts with a pile of lumber strewn about your yard. If it isn't strewn about haphazardly the whole thing is going to suck (more on that later). I started out laying a bunch of boards together to make a panel; which, obviously will be turned into a wall.
 |
| Laying the boards across two perpendicular pieces helps you later when you make your cuts. |
|
To hold everything tight together, I use these snazzy bar clamps. They "eskweez" (hear Nacho Libre in your head please) the boards together so you can use both hands for other stuff. Over time the boards will dry out and shrink a little, so starting out with the least amount of gappage (let's just make that word today) helps you avoid severe gappage down the road.
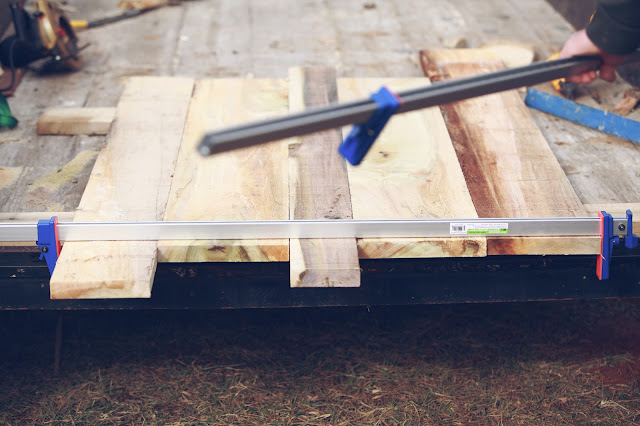 |
| These clamps were $12.99 at Harbor Freight, I will be happy if they last til the end of the month. |
 |
| This is how they "eskweez". The other end locks in at on inch intervals to get close, then you clamp. |
Once you make the first panel, you've set the height for the other ones. Sometimes I can rummage through the lumber pile and come up with a lucky combination. Other times I have to rip the last board down on the table saw.
 |
| You gotta measure this stuff. |
The next step, is to stitch them all together. I set two boards running straight up and down, exactly 4 feet apart at the outside edges. They get tacked down with a finish nailer, just to hold everything together. All the overhanging stuff is trimmed off with a circular saw, which leaves a handy little 1 1/4 inch lip, the same thickness as my boards. This will all make sense when you look at the pictures.
 |
| The saw is ripping through the boards we "eskweezed" together. The board guiding the saw is nailed into the boards being ripped, it stays there and will later be made strong like bull with some serious screws. |
 |
| This conveniently staged shot illustrates how the panels will fit together later on. Try to keep a running tally of the cuts on my fingers, it's a miracle I still have them all. |
Alright, once the four panels are made, I start thinking about how to make the gables, the part that goes up to meet the roof. If I had the roof come up from all four sides, like a rectangular pyramid, it would be harder to build, more roofing material and less space inside the coop. This little guy is going to have "gabled ends" as they say, so now you know what
that means. Or not, I may have just made all that up.
On the two end panels, I sort of follow the same idea by adding more boards, except now they are coming in at a 45 degree angle, I will show you.
 |
| I cut three boards to make the triangle at the top of this panel. My feet are going through a missing board in the panel, the missing board is going to become a hatch later. |
These new triangle pieces need to be held together somehow, so I cut two boards to make a nice 90 degree thingy. I tack a little brace on there to make it into an "A". The brace keeps it from pulling apart while I'm setting everything up, after it's screwed on I just pull the brace right off with my man hands.
 |
| Here's the "A", supported by said man hand. I bet there's saw dust blowing in my eyes. That stupid panel on the left broke the lens cover off the trailer light too. |
 |
| I fiddle around with it until both sides are lines up with the top corners of the panel, and the point is right is the center. |
 |
| This thing helps you line it up. |
 |
| Here's the finish nailer. The nails are basically like super stiff wire, they barely leave a mark if you leave them in, and there's only a tiny hole if you pull the whole board off, like I will do with the brace. |
 |
| I had just said something to Brinn like, "Hey get one of me holding the gun sideways, gangsta style". Again, there must have been a small blizzard of sawdust blowing around. |
 |
| This totally sums up life at our house right now. Huge mess all over the place, and these two thugly ducklings, roaming the property, daring some punk #@$ chicken to step on their turf. I don't even mess with them. |
I'll end with this last picture. I just went out on the porch and snapped it with my phone to show you what everything looked like at the end of the day.
 |
| Excuse the quality friends. We're talking about a phone here. |
I know I left out a lot of stuff, but Brinn got busy with the kids so I don't have the pictures to move the story along. You'll just have to stay tuned for the next one. All I have left is to tar paper and shingle the roof, make the nesting box, put hinges on the door and hatch, and cover the corners with some trim pieces. A few hours I bet. I would have posted all this last night and been out working all morning, but the internet was out at the house, so I'm getting a late start again today. I'll put pictures up of the finished product.
-F.W.
P.S., Hopefully today I'll be able to get started on my first commissioned coop! Check back to see how it goes!


No comments:
Post a Comment